


")


-
×
 FC-51 IR CAPTEUR D'OBSTACLE POUR ARDUINO
1 × 3,600 DT
FC-51 IR CAPTEUR D'OBSTACLE POUR ARDUINO
1 × 3,600 DT
Sous-total : 3,600 DT
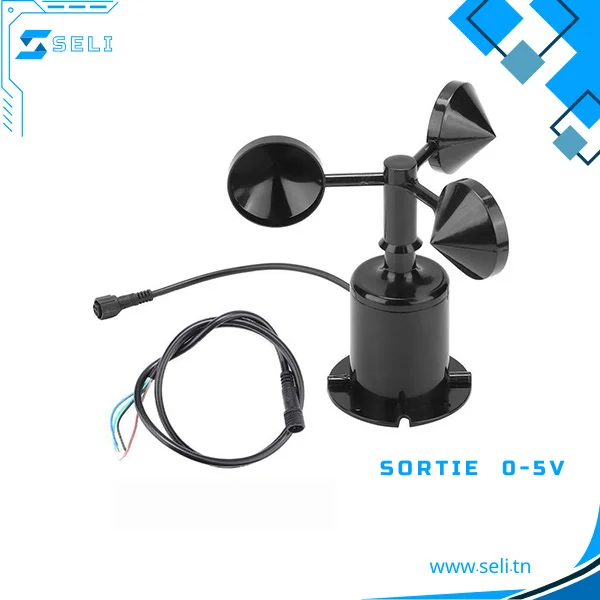
SKU: ANEM-05-1
Disponibilité: ✅ Produit disponible !
76,400 DT
The Renke RS-FSJT-N01 Wind speed anemometer is sold in four versions:

Parameters:
Configuration presented here is for the RS485 digital ModBUS version.
The cable coming out through the bottom of the unit has the folling pinout:
Wire up a an RS485 transceiver to an ESP32 to interface with the device using ESPHome’s Modbus Component.
Connection parameters:
4800 (default), supports 2400 and 96008None110U_WORD, multiplied by 10Slow winds blow in small bursts, so it’s recommended to average measurements to have a better overview of the wind condition. That’s why we’re reading out the measurement every second, and apply a filter to the sensor, taking the maximum blow speed of 5 measurements, averaging them every minute:
uart:
rx_pin: GPIOXX
tx_pin: GPIOXX
baud_rate: 4800
modbus:
id: modbus1
modbus_controller:
– id: wind_speed_meter
address: 1
modbus_id: modbus1
setup_priority: -10
command_throttle: 200ms
update_interval: 1s
sensor:
– platform: modbus_controller
modbus_controller_id: wind_speed_meter
name: “Wind speed”
device_class: wind_speed
register_type: read
address: 0
unit_of_measurement: “m/s”
value_type: U_WORD
accuracy_decimals: 1
filters:
– multiply: 0.1
– max:
window_size: 5
send_every: 5
– exponential_moving_average:
alpha: 0.1
send_every: 12
Note that the sensor is by default set to ModBUS address 1, so out of the box it’s not possible to connect it together with another one (like a RS-FXJT-N01 wind direction sensor) to the same ESP UART.
The device modbus address is stored in register 2000. To change it, you can use the following temporary ESPHome configuration:
sensor:
– platform: modbus_controller
modbus_controller_id: wind_speed_meter
name: “Device current address”
register_type: read
address: 2000
value_type: U_WORD
number:
– platform: modbus_controller
modbus_controller_id: wind_speed_meter
name: “Device new address”
address: 2000
register_type: holding
value_type: U_WORD
mode: box
The new entered value will be sent to the device immediately, causing it to become offline. You need to change the address value in the corresponding modbus_controller entry to the value you just used.
Alternatively, the manufacturer offers a helper application for Windows, called 485 Parameter Configuration Tool. The sensor can be connected to the PC with a USB-to-RS485 adapter, and the configuration tool makes it easily possible to change the device address to something else (just type it in the Addr box and press Setup button).
After that it becomes possible to simply connect the sensors in parrallel on the same cable, to a single RS485-TTL transceiver attached to a single UART on the ESP.
The device baud rate is configured in register 2001 using an ID:
| Baud rate | ID |
|---|---|
| 2400 | 0 |
| 4800 | 1 |
| 9600 | 2 |
| 19200 | 3 |
| 28400 | 4 |
| 57600 | 5 |
| 115200 | 6 |
To change it, you can use the following temporary ESPHome configuration:
sensor:
– platform: modbus_controller
modbus_controller_id: wind_speed_meter
name: “Device current baud ID”
register_type: read
address: 2001
value_type: U_WORD
number:
– platform: modbus_controller
modbus_controller_id: wind_speed_meter
name: “Device new baud ID”
address: 2001
register_type: holding
value_type: U_WORD
mode: box
The new entered value will be sent to the device immediately, causing it to become offline. You need to change the baud_rate value in the corresponding uart entry to the value you just entered.
To avoid accidental address changes, it’s recommended to comment out the above sections, then reflash node with the new settings. Only have one device connected at the time working with these settings.
Only logged in customers who have purchased this product may leave a review.

There are no reviews yet.