Dark Light
-14%

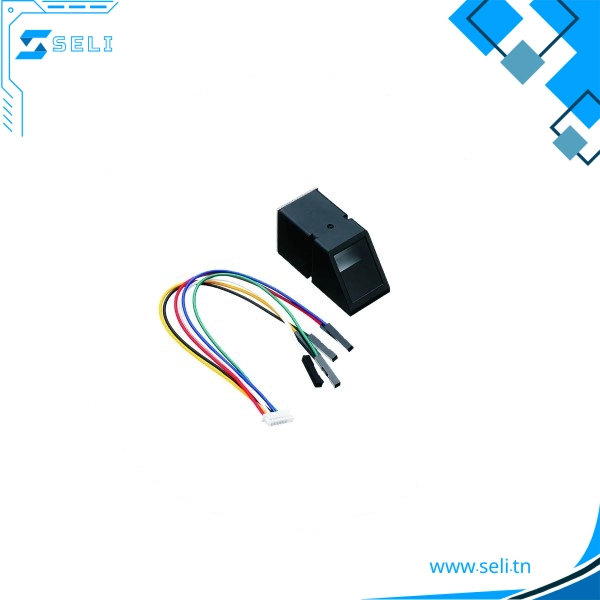
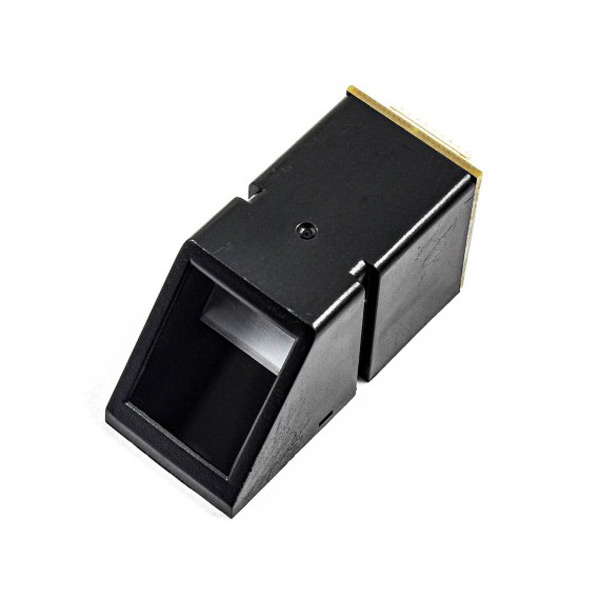
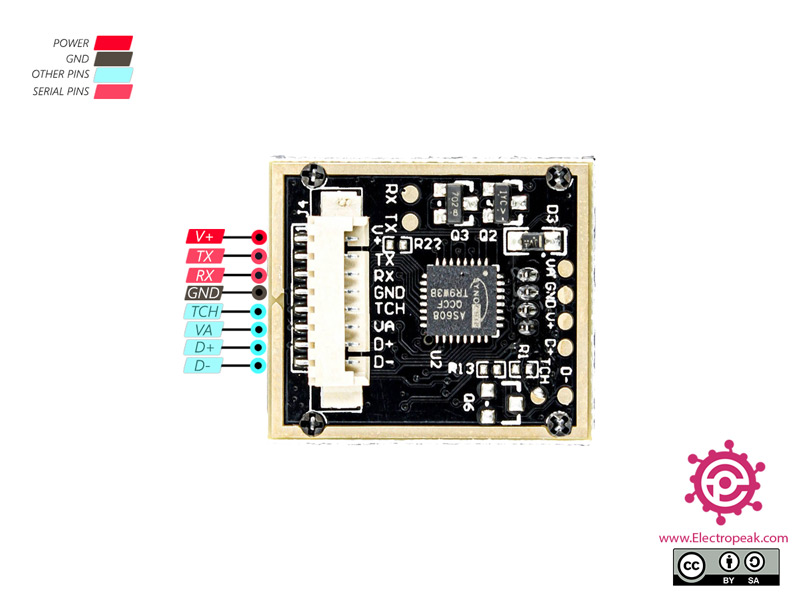
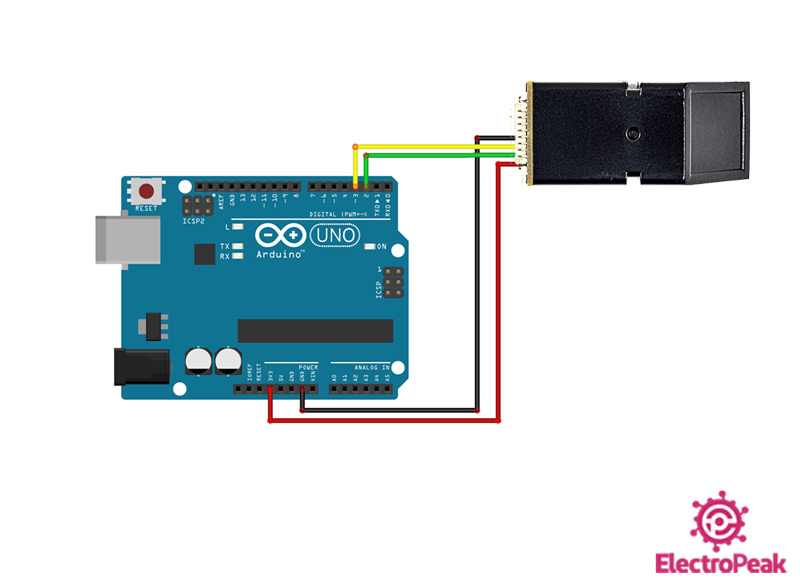
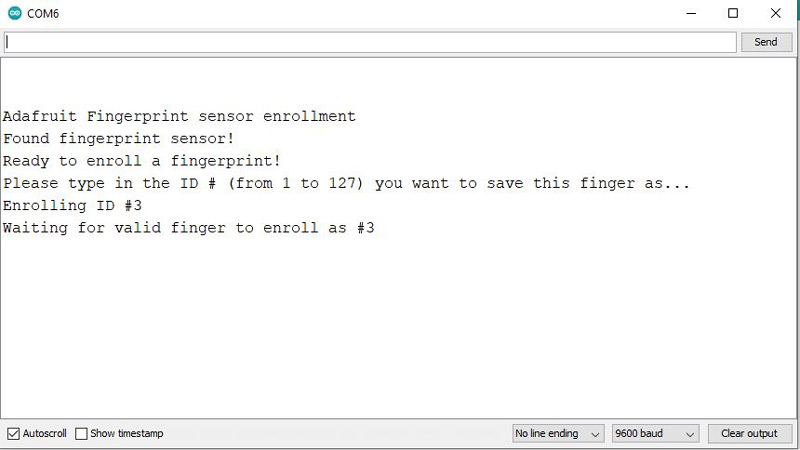
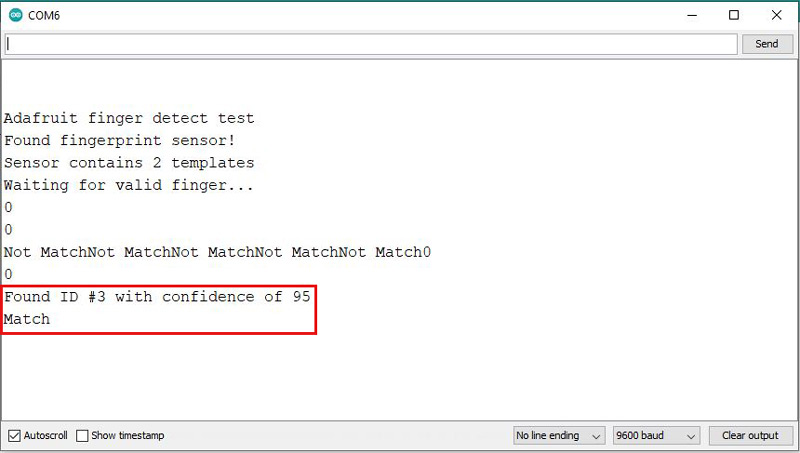
AS608 CAPTEUR LECTEUR D’EMPREINTE DIGITAL

SKU: CAP038

Disponibilité :

✅ Produit disponible !


Capteur de lecteur d’empreintes digitales AS608, technologie optique d’empreintes digitales pour serrures, interface de communication série

85,000 DT 99,000 DT

✅ Produit disponible !

Interfacing AS608 Optical Fingerprint Sensor Module with Arduino provides a comprehensive guide on integrating the AS608 optical fingerprint sensor with Arduino for secure fingerprint scanning and identification. This step-by-step guide will walk you through the process of enrolling and verifying fingerprints using the AS608 module. Discover how to connect the module to Arduino, install the required library, and follow the enrollment and verification procedures. Get started on your fingerprint sensor project today!

AS608 Optical Fingerprint Sensor Features

The AS608 optical fingerprint sensor can be used to scan fingerprint and it can send the processed data to a microcontroller via serial communication as well. All registered fingerprints are stored in this module. The AS608 is capable of storing up to 127 individual fingerprints

The most important features are:

  • Supply voltage: 3.3V
  • Maximum current supply: 60mA
  • Resolution: 500dpi
  • Max fingerprint imaging time: 1s
AS608 Optical Fingerprint Sensor

AS608 Optical Fingerprint Sensor Pinout

This Module has 4 useful pins:

  • V+: Module power supply – 3.3V
  • GND: Ground
  • TX: Serial Transmitter
  • RX: Serial Receiver

You can see the pinout of this module in the image below.

AS608 Optical Fingerprint Sensor Pinout

Required Material

Hardware component

Arduino UNO R3 × 1
AS608 Optical Fingerprint Reader Sensor Module × 1

Software Apps

Arduino IDE

Interfacing AS608 Optical Fingerprint Sensor with Arduino

Step 1: Circuit

The following circuit show how you should connect Arduino to AS608 sensor. Connect wires accordingly.

AS608 Module Arduino circuit

Step 2: Library

Go to Library manager and search for Fingerprint, install the following library.

Tip

If you need more help with installing a library on Arduino, read this tutorial: How to Install an Arduino Library

Step 3: Enrolling Fingerprint

First, upload the following code to Arduino.

  /*
  AS608-Optical-Fingerprint-Sensor-enroll
  Home
    based on Adafruit Library

*/
#include <Adafruit_Fingerprint.h>

SoftwareSerial mySerial(2, 3); // TX/RX

Adafruit_Fingerprint finger = Adafruit_Fingerprint(&mySerial);

uint8_t id;

void setup()  
{
  Serial.begin(9600);
  while (!Serial);  // For Yun/Leo/Micro/Zero/...
  delay(100);
  Serial.println("\n\nAdafruit Fingerprint sensor enrollment");

  // set the data rate for the sensor serial port
  finger.begin(57600);
  
  if (finger.verifyPassword()) {
    Serial.println("Found fingerprint sensor!");
  } else {
    Serial.println("Did not find fingerprint sensor :(");
    while (1) { delay(1); }
  }
}

uint8_t readnumber(void) {
  uint8_t num = 0;
  
  while (num == 0) {
    while (! Serial.available());
    num = Serial.parseInt();
  }
  return num;
}

void loop()                     // run over and over again
{
  Serial.println("Ready to enroll a fingerprint!");
  Serial.println("Please type in the ID # (from 1 to 127) you want to save this finger as...");
  id = readnumber();
  if (id == 0) {// ID #0 not allowed, try again!
     return;
  }
  Serial.print("Enrolling ID #");
  Serial.println(id);
  
  while (!  getFingerprintEnroll() );
}

uint8_t getFingerprintEnroll() {

  int p = -1;
  Serial.print("Waiting for valid finger to enroll as #"); Serial.println(id);
  while (p != FINGERPRINT_OK) {
    p = finger.getImage();
    switch (p) {
    case FINGERPRINT_OK:
      Serial.println("Image taken");
      break;
    case FINGERPRINT_NOFINGER:
      break;
    case FINGERPRINT_PACKETRECIEVEERR:
      Serial.println("Communication error");
      break;
    case FINGERPRINT_IMAGEFAIL:
      Serial.println("Imaging error");
      break;
    default:
      Serial.println("Unknown error");
      break;
    }
  }

  // OK success!

  p = finger.image2Tz(1);
  switch (p) {
    case FINGERPRINT_OK:
      Serial.println("Image converted");
      break;
    case FINGERPRINT_IMAGEMESS:
      Serial.println("Image too messy");
      return p;
    case FINGERPRINT_PACKETRECIEVEERR:
      Serial.println("Communication error");
      return p;
    case FINGERPRINT_FEATUREFAIL:
      Serial.println("Could not find fingerprint features");
      return p;
    case FINGERPRINT_INVALIDIMAGE:
      Serial.println("Could not find fingerprint features");
      return p;
    default:
      Serial.println("Unknown error");
      return p;
  }
  
  Serial.println("Remove finger");
  delay(2000);
  p = 0;
  while (p != FINGERPRINT_NOFINGER) {
    p = finger.getImage();
  }
  Serial.print("ID "); Serial.println(id);
  p = -1;
  Serial.println("Place same finger again");
  while (p != FINGERPRINT_OK) {
    p = finger.getImage();
    switch (p) {
    case FINGERPRINT_OK:
      Serial.println("Image taken");
      break;
    case FINGERPRINT_NOFINGER:
      break;
    case FINGERPRINT_PACKETRECIEVEERR:
      Serial.println("Communication error");
      break;
    case FINGERPRINT_IMAGEFAIL:
      Serial.println("Imaging error");
      break;
    default:
      Serial.println("Unknown error");
      break;
    }
  }

  // OK success!

  p = finger.image2Tz(2);
  switch (p) {
    case FINGERPRINT_OK:
      Serial.println("Image converted");
      break;
    case FINGERPRINT_IMAGEMESS:
      Serial.println("Image too messy");
      return p;
    case FINGERPRINT_PACKETRECIEVEERR:
      Serial.println("Communication error");
      return p;
    case FINGERPRINT_FEATUREFAIL:
      Serial.println("Could not find fingerprint features");
      return p;
    case FINGERPRINT_INVALIDIMAGE:
      Serial.println("Could not find fingerprint features");
      return p;
    default:
      Serial.println("Unknown error");
      return p;
  }
  
  // OK converted!
  Serial.print("Creating model for #");  Serial.println(id);
  
  p = finger.createModel();
  if (p == FINGERPRINT_OK) {
    Serial.println("Prints matched!");
  } else if (p == FINGERPRINT_PACKETRECIEVEERR) {
    Serial.println("Communication error");
    return p;
  } else if (p == FINGERPRINT_ENROLLMISMATCH) {
    Serial.println("Fingerprints did not match");
    return p;
  } else {
    Serial.println("Unknown error");
    return p;
  }   
  
  Serial.print("ID "); Serial.println(id);
  p = finger.storeModel(id);
  if (p == FINGERPRINT_OK) {
    Serial.println("Stored!");
  } else if (p == FINGERPRINT_PACKETRECIEVEERR) {
    Serial.println("Communication error");
    return p;
  } else if (p == FINGERPRINT_BADLOCATION) {
    Serial.println("Could not store in that location");
    return p;
  } else if (p == FINGERPRINT_FLASHERR) {
    Serial.println("Error writing to flash");
    return p;
  } else {
    Serial.println("Unknown error");
    return p;
  }   
}
Arduino

The above program is for enrolling fingerprints. With this program you can enroll 127 different fingerprints. Run the program and open the Serial Monitor. The general process for enrolling a fingerprint is as follows:

1- Enter Fingerprint ID

Before enrolling any fingerprint, you must first enter its ID. You are allowed to choose the number 1 to 127. For example, in the image below, we have selected number 3.

2- Place finger on sensor

Next you need to place your finger on sensor for the first image.

3- Place finger on the sensor again

Now you have to put your finger on the sensor again for the second image. When this step is completed correctly, the phrase Stored will appear.

Step 4: Test and Verify fingerprint

First, upload the following code to Arduino.

  /*
  AS608-Optical-Fingerprint-Sensor-enroll
    Modified on 06 Jan 2021
  by Amir Mohammad Shojaee @ Electropeak
  Home
    based on Adafruit Library

*/

#include <Adafruit_Fingerprint.h>

volatile int finger_status = -1;

SoftwareSerial mySerial(2, 3); // TX/RX on fingerprint sensor

Adafruit_Fingerprint finger = Adafruit_Fingerprint(&mySerial);

void setup()  
{
  Serial.begin(9600);
  while (!Serial);  // For Yun/Leo/Micro/Zero/...
  delay(100);
  Serial.println("\n\nAdafruit finger detect test");

  // set the data rate for the sensor serial port
  finger.begin(57600);
  
  if (finger.verifyPassword()) {
    Serial.println("Found fingerprint sensor!");
  } else {
    Serial.println("Did not find fingerprint sensor :(");
    while (1) { delay(1); }
  }

  finger.getTemplateCount();
  Serial.print("Sensor contains "); Serial.print(finger.templateCount); Serial.println(" templates");
  Serial.println("Waiting for valid finger...");
}

void loop()                     // run over and over again
{
  finger_status = getFingerprintIDez();
  if (finger_status!=-1 and finger_status!=-2){
    Serial.print("Match");
  } else{
    if (finger_status==-2){
      for (int ii=0;ii<5;ii++){
        Serial.print("Not Match");
      }
    }
  }
  delay(50);            //don't ned to run this at full speed.
}

// returns -1 if failed, otherwise returns ID #
int getFingerprintIDez() {
  uint8_t p = finger.getImage();
  if (p!=2){
    Serial.println(p);
  }
  if (p != FINGERPRINT_OK)  return -1;
  
  p = finger.image2Tz();
  if (p!=2){
    Serial.println(p);
  }
  if (p != FINGERPRINT_OK)  return -1;

  p = finger.fingerFastSearch();
  if (p != FINGERPRINT_OK)  return -2;
  
  // found a match!
  Serial.print("Found ID #"); Serial.print(finger.fingerID); 
  Serial.print(" with confidence of "); Serial.println(finger.confidence);
  return finger.fingerID; 
}
Arduino

This code is for testing and matching fingerprints. First run the program and then open the Serial Monitor. At this point, the program waits for a finger to be placed on the sensor for identification. After placing the finger on the sensor, the phrase “Match” is displayed if the fingerprint is already stored, and phrase “Not Match” is displayed if fingerprint is not detected.

In addition, if fingerprint is identified, the corresponding ID will be specified.

Explore the potential of the AS608 Optical Fingerprint Sensor module in various applications that require secure and reliable fingerprint scanning and identification. Follow our step-by-step guide to unlock the full potential of this powerful module in your projects.

Don’t wait any longer! Start your fingerprint sensor project today and experience the convenience and security it offers.

UGS : CAP038 Catégorie :

Based on 0 reviews

0.0 overall
0
0
0
0
0

Only logged in customers who have purchased this product may leave a review.

There are no reviews yet.